What is RSAT, and How Does it Help Administrators?
IT administrators can remotely manage Windows Server roles and features using Remote Server Administration Tools (RSAT) from a computer running Windows 10, Windows 8.1, Windows 8, or Windows 7. It is a client-based management solution that enables administrators to control Windows servers remotely. Administrators may complete most routine administrative duties using its suite of tools. RSAT allows administrators to handle every part of Windows Server roles and features from the command prompt and the graphical user interface (GUI). RSAT makes administrators’ jobs easier from various perspectives, including remotely managing servers and users, automating operations, and finding and fixing bottlenecks. RSAT has tools for controlling Windows services, accessing files and directories, and managing roles and features. There are numerous purposes for using RSAT, including managing users, installing programs, monitoring and configuring servers, and installing and configuring software. In addition to the above, it controls Active Directory, Group Policy, DNS, file servers, and printers. RSAT also helps to maintain user accounts and groups as well. Additionally, it enables remote virtual private server (VPS) management.
Benefits of Using RSAT
Administrators require the RSAT toolkit to manage servers and services remotely. There are numerous causes for this, but the most frequent one is that administrators must be able to handle servers spread across various continents. Particularly when it comes to cloud-based services, this is crucial. RSAT is also necessary for administrators to administer servers that are utilized internally, such as intranet or e-commerce websites. Businesses may use RSAT for a variety of reasons. One of the critical causes is that RSAT makes it simple and convenient for administrators to do server and other support tasks remotely. Because of the centralized administration it offers, administrators can control several servers from a single user interface. As they even enable server performance monitoring through server log viewing, these RSAT tools are crucial for system administrators.
List of Tools Included in RSAT
The RSAT tools available in Windows 10 and 11 to perform various administrative activities are listed below.
Active Directory Domain Services and Lightweight Directory Services Tools BitLocker Drive Encryption Administration Utilities Active Directory Certificate Services Tools DHCP Server Tools DNS Server Tools Failover Clustering Tools File Services Tools Group Policy Management Tools IP Address Management (IPAM) Client Data Center Bridging LLDP Tools Network Controller Management Tools Network Load Balancing Tools Remote Access Management Tools Remote Desktop Services Tools Server Manager Shielded VM Tools Storage Migration Service Management Tools Storage Replica Module for Windows PowerShell System Insights Module for Windows PowerShell Volume Activation Tools (KMS server console) Windows Server Update Services Tools.
The following sections will look at how to install RSAT using the GUI (graphical user interface), DISM (Deployment Image Servicing and Management), and PowerShell command line.
Installing RSAT Using GUI
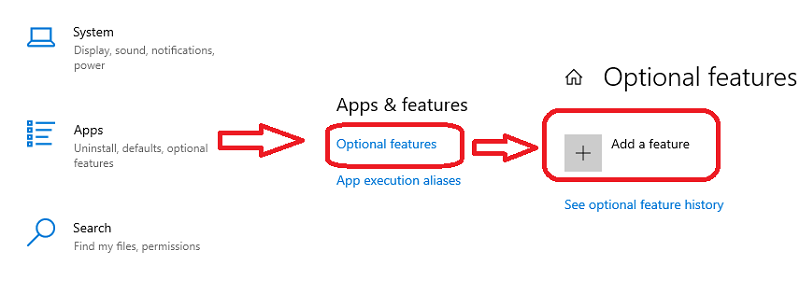
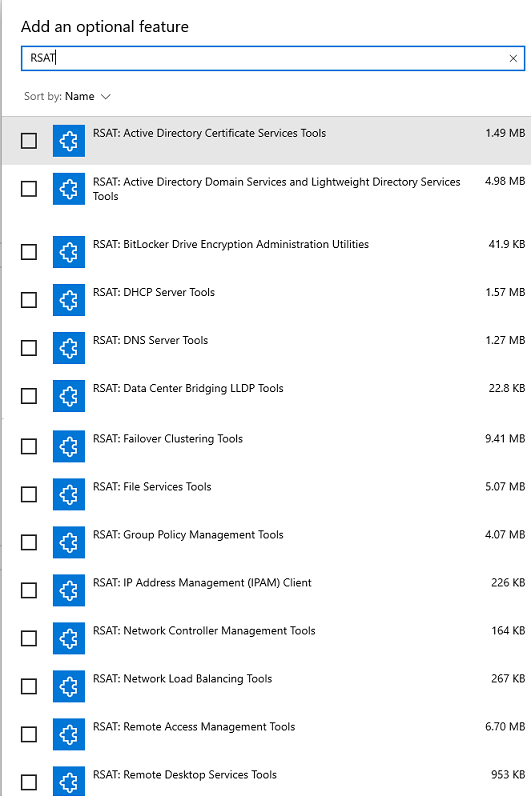
The GUI method of installing RSAT is the most frequently utilized by businesses because of its easiness and user-friendly. RSAT is now a part of Windows 10’s “Features on Demand,” starting with the October 2018 Update. If you have Windows 10 October 2018 Update or later, there is no need to download and install RSAT tools. You only need to activate it by taking the following actions: Please note: You need to download and install RSAT using this link if you have an earlier version of Windows 10 (before October 2018). To access the RSAT tools in Windows 10 and Windows 11, navigate (as shown in Picture 1) to – Settings – > Apps -> Optional Features -> Click Add a feature as shown: After clicking on the add feature option, you will get the search box where you can type RSAT and see all RSAT tools, as shown below in Picture 2. You can select the RSAT tool as per your requirement, which will be installed in your system. After completing the above process, the Administrative Tools folder appears on the Start menu. You may also type “Tools” into the taskbar’s search box to find Windows Administrative Tools or access the path “Control Panel\System and Security\Administrative Tools ” in the windows browser to see the list of RSAT tools installed.
Installing RSAT on Windows 8
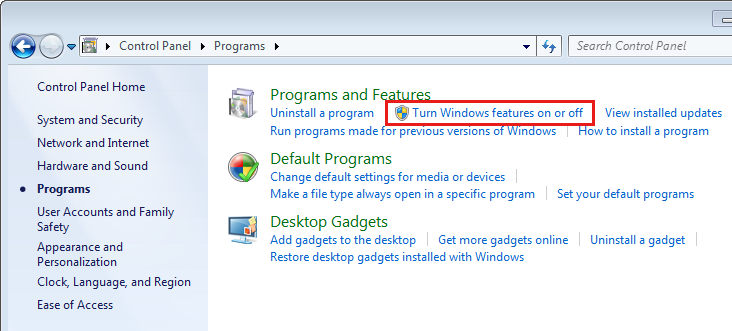
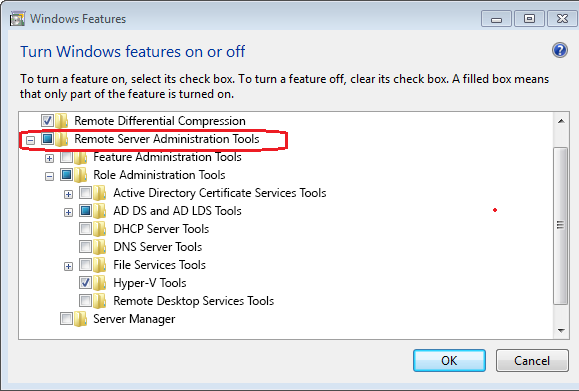
If you’re running Windows 8.1, you may download the RSAT tools you need from Microsoft, depending on your system architecture (x64 or x86), and install them by following the onscreen instructions. All of RSAT’s tools are automatically enabled once the installation is complete. If you wish to disable a specific utility, go to the “Turn Windows Features on or off” option in the program section of the control panel, as shown in the picture below. As illustrated in the picture below, locate the Remote Server Administration Tools option, expand it, and deselect the check box next to any RSAT tools you don’t wish to use.
Installing RSAT on Windows 7 & Windows Vista
On a Windows 7 computer or Vista, you must download and run the installation package. Additionally, Service Pack 1 is necessary to enable RSAT tools. Windows 7 no longer receives support from Microsoft. After the installation, you must activate Remote Server Administration Tools in the Control Panel by selecting Turn Windows features on or off, as indicated in the picture below. Then, as seen below, you must check the box next to the tool you want in the RSAT section.
Installing RSAT on Windows Servers
No additional packages need to be downloaded to install RSAT on Windows 2008, 2008 R2, 2012, 2012 R2, 2016, and 2022 servers. To enable RSAT in Windows 2008 and Windows Server 2008 R2, navigate to the Add Features Wizard -> Choose Features option -> and expand Remote Server Administration Tools. While for other remaining server editions, go to Add Roles and Features Wizard -> Choose Features option -> and expand Remote Server Administration Tools to choose the tools you need to install, as seen in the picture below. The above section shows how to install and enable RSAT tools through the GUI method. In the following section, we will see how to do it through DSIM (Deployment Image Servicing and Management).
Installing RSAT Using DSIM
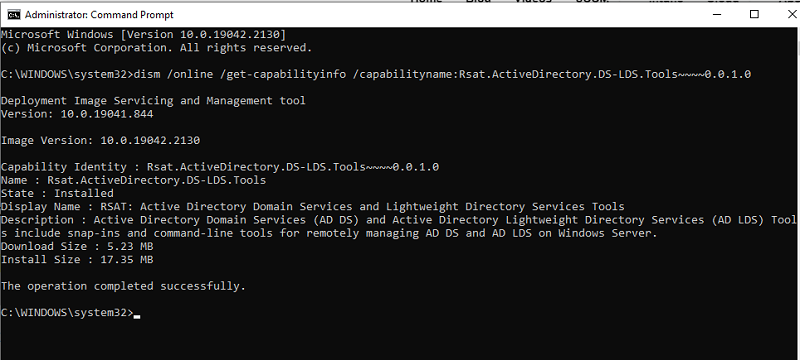
A command-line program in Windows called Deployment Image Servicing and Management (DISM.exe) is used to maintain a virtual hard disc or a Windows image (.wim) (.vhd or .vhdx). Please download and install the Windows Assessment and Deployment Kit if your PC requires a different version of DISM. It can be executed via the command prompt and is, by default, found in the c:\windows\system32 folder of every Windows system. The DISM command comes in-built into all Windows operating systems and can be executed using PowerShell or a command prompt. Run the command below from the command prompt to use DISM to check the status of the RSAT-installed tools. Following the execution of this command, a window displaying the installed RSAT tools will appear as shown below: DISM’s primary function is to service and prepare Windows images and is not frequently used for RSAT installation. Powershell’s command prompt is an alternative to DISM, which is covered in the section below.
Installing RSAT Using PowerShell
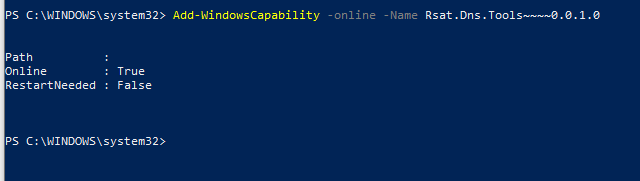
Beginning with Windows 7 Service Pack 1 and Windows Server 2008 R2 Service Pack 1, Windows PowerShell is pre-installed on every version of Windows. Through the Windows PowerShell command prompt (cmdlet), specialized RSAT tools can be installed and enabled. Let’s look at how to use it in the below section: You will obtain the PowerShell command prompt if you type the word “PowerShell” at the command prompt. Enter the following command at the PowerShell prompt to check the RSAT tools currently installed on your Windows system. The above command will provide a list of all installed and accessible RSAT tools, as seen in the picture below. As it is visible that only Active Directory Domain Services and Server Manager are installed in the below-mentioned picture. To install a specific RSAT tool, you need to use the command: For example, if you want to install DNS (Domain Name Server), then you need to run Following that, DNS installation will begin, as shown below. After finishing the above command, a window stating that a restart is not required will appear, as shown below: Run the following command to install all RSAT tools at once: If you want to install only the missing RSAT tools all at once, then you can run the below command The following is the list of commands to install specific RSAT utilities:
Points to Remember
Admins must install RSAT tools having administrator rights. RSAT cannot be installed on Windows Home, Standard, or Education editions. Only Windows Professional or Enterprise editions support the installation of RSAT. Before installing the latest RSAT, uninstall all previous versions of the Administration Tools Pack. If you installed RSAT but don’t see all tools, then make sure the Active Directory Users and Computers path are set to %SystemRoot%system32dsa.msc. Ensure your PC has the most recent Windows updates installed if the target is accurate. If RSAT is not getting installed, then turn Windows Firewall ON or OFF under Services and recheck. If the machine doesn’t have the most recent Windows updates, RSAT may not install or perform as needed. RSAT problems have occasionally been fixed by deleting all associated files and erasing any previous RSAT.
Final Words
Without the need for Windows domain controllers, RSAT is one of the many flexible features that Microsoft offers administrators to manage Windows Infrastructure remotely. Because of its adaptability, RSAT can be implemented in various ways. Regardless of whether you employ the GUI, the DISM command, or PowerShell. Next, you can check out how to set up system environment variables in Windows.
![]()
![]()


![]()
![]()
![]()
![]()

![]()


![]()
![]()
![]()

